Tutorial 1 - Making and Displaying Lists
Welcome to the first proper tutorial, if you haven’t read the introduction yet I would recommend that as it covers most of the basics that I won’t be covering in this tutorial. This tutorial will:
- Show you how to create a list
- Talk about a few different types of data that can be stored in objects
- Show you how to display a list on your web-page without writing any code
- Give you a basic understanding of the Ultimate Database (UDB) Command syntax and how it works
- Make you more comfortable using the Ultimate Admin Area (UAA)
So to make this example less boring and give you an idea of what lists can be used for in the actual deployment of UDB we will be making a product list (aka - an online shop ‘shop’ page).
Step One - Setting up the list.
The first step to making a list is actually making a list. To do this we need to go to the Ultimate Admin Area and navigate to wherever we want to store our list objects, I would recommend the Content section as that is what I will be using in this example.
To start with I am going to create an ‘App List’ as a section to store everything to do with this online shop area. So to do this right click anywhere on the content page and select ‘New App List’. Give it a name such as ‘Product Area’ and click ‘Save’.
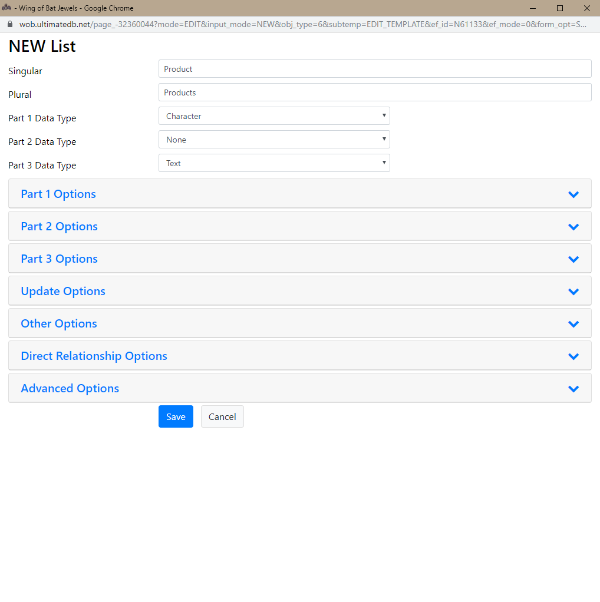
Now go into ‘Product Area’ and right click anywhere, on the menu select ‘New Data List’, this is what we will use to store our products. First off give it a name, I am going to call mine ‘Products’, now we need to define what kind of data each object is going to store in it so let’s think about what we need for a product - we need a name and a description - Bare in mind it is possible to add more than 2 sets of data but I will cover that in a more advanced tutorial - so for our example we are going to set:
- Part 1 Data Type to Character - this is a short text field, meant for titles and short descriptions.
- Part 2 Data Type to None - This will remove the second data set.
- Part 3 Data Type to Text - This is meant for Long descriptions or paragraphs.
Once we have set these we can give each one options, for our example we will set a part 1 and part 3 placeholder, The part one placeholder should be something like ‘Title’ or ‘Name’, the part three placeholder should be something like ‘Description’. Once this is done click the ‘Save’ button.
Once this is saved you have successfully created your first list!
Step 2 - Creating list Objects.
I’ll start out by saying: you CAN skip this step. This is simply for absolute beginners. To add a new object to the list click the list we just created to go ‘into’ it, once in the list right click and select ‘New Item’ this will open a new window that will allow you to input the new object details - more on this later.
Step 3 - Generating a list template.
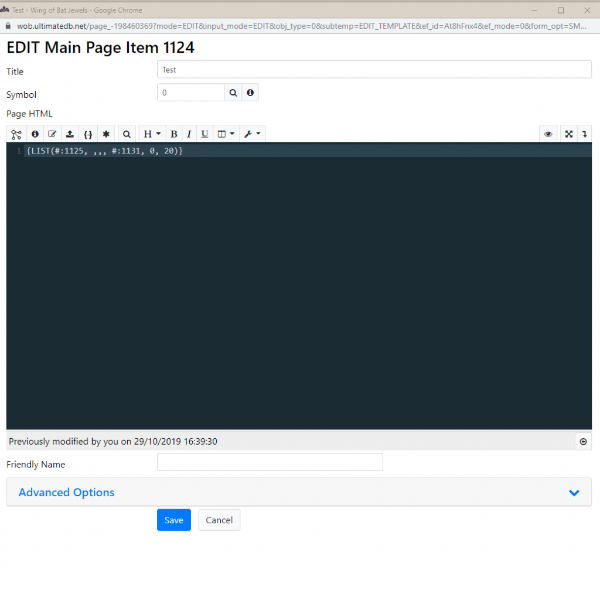
Go into the list we just created by clicking on it, on the left side of the screen, in line with the recent objects tab you will see 3 buttons, a light blue, green and yellow one. Click on the green one, this is the valid links tab, you can get back to the recent objects tab by clicking the dark blue button to the left of the green one, Here you can generate sub templates, edit templates or list templates. We want to make a list template so click on the wand furthest to the right. This opens some automatically generated code that looks very scary but don’t panic! Just click create, this will generate a UDB list command that links the list and the list template. To learn more about how the UDB list command works see *here*, for now though, copy the LIST command that comes up below the html code.
Step 4 - Rendering the list.
So now we have created a list and a list template, the last step is to display it on the web page. To do this let’s go to the web-page that you want to show the list on and go to Account > Edit Page, this will bring up a new window with a title box that will have the name of the page in it and then it will either have a regular text area or it will have an html text area, it makes no difference as the UDB command will be picked up either way, so go into the text box and paste the command we copied, then simply click save.
You may need to refresh the page or it might do it for you but you will now have something that looks like this:

Now we can click the Add button, this will bring up the same window as step 3, we can fill in a title and a description and then click save, The new items title will appear on the list and if we click it it will display the description. If you go back to the admin area and go into the list you will see that the new item is displayed there too.
So the list command that we created is essentially saying ‘I want to display a list(this is the list id,,,,this is how i want you to display it,I don’t want display options,this is how many items to display on 1 page), we could have written this all manually if we wanted so I will cover how to make a custom list template in another tutorial.